 Being creative with your yard or home required landscape lighting can bring you towards so many cool ideas. But then again, the cool ideas also need proper installation. Which sometimes by DIYing can fail.
However, if you know the proper steps to achieve things one by one, then there’s a good chance of ending with something beautiful. Plus, you’re the one who gets the credit of being creative and capable of handling it on your own.
One very important thing with this whole matter is how to splice low voltage landscape lighting wire. Since sometimes the kits that we bring home come with pre-cut wires. And that proves to be pretty short on our plan or project for landscape lighting. But don’t worry, today let’s get into the core of this whole process.
Everything on How to Slice Low Voltage Landscape Lighting Wire.
Okay, before getting into the main agenda, there’s one thing I would like to mention. The choice of light and switch has a lot to do with installation process. These days people are very fond of smart technology. Smart Light Switch is convenient, affordable, and making life easier at the same time.
The same goes for Smart Plugs. Being in love with the LED Recessed Lights for their capabilities is also common nowadays. Whatever your choice of light and switch is, to make sure before jumping on work, you at least once give the included manual a good read. That’s just friendly advice I wanted to give, let’s move onto the wire slicing thing below.
Be Prepared & Safe.
A safe and well-started project never disappoints no matter if you are an expert or a noob at DIYing. Now with something that may sound as simple as splicing wire, you may forget to prep. Or think it’s not necessary.
But in reality, it is. Make sure you are paying attention to turning the power off from main outlet at breaker. Your very first task for safety whenever working with electrical projects. After that, you want to gather wire cutters and strippers if available at your home. If not, then get some from your local hardware store. You are also going to need a proper soldering iron. If there’s no power outlet nearby for plugging the iron, you’ll also need an extension cable.
Now a bit about the time when you are buying extra length of wire. The landscape lighting kit you are using should have an existing wire. Make sure the extra ones are matching with this existing one. The common wires for landscaping lighting are either 12 or 14. But there are also 10 to 20 gauges range available. You need to care about matching the construction too, not just their voltage.
Then you will need some heat shrinking tubes for the project. This thing is available in so many sizes., numbers per package, and lengths. You need to take your gauge wire’s diameter into account for buying it.
This also needs the information of how many slices you’re going for. Each splice would need around 2 inches of lengthy four tubes. You can make the calculation of how many tubes you’re needing, based on your project.
Get Any Existing Lighting Out.
Start by getting the old landscape lighting disconnected. You want to detach it from the power source. Then work on stretching the wire out completely. Once you are done, move on fixing the spot where you’ll be making a cut. Usually, it’s on middle of the wire.
Cutting Wire in Half.
Now you need to lay the wire on a flat surface. Then exactly halfway, make a cut. You want to splice it equally. You need the measurement for length of new wiring that is required for this project. Use this measurement for cutting from the half. Taking accurate calculation here is really crucial if you want your plans to fall into place accordingly.
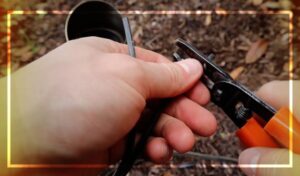
Slicing from End of Each Lead.
On both wires, carefully separate the leads. The ends out are planning to splice, go around 4 to 6 inches from it. Then you want to get rid of at least an inch of insulation. This needs to be done from the very end of each lead.
Now you are left with 4 separated bare leads. Here comes the need for heat shrink tubing. It needs to be at least 2 inches in length. Simply slip it over each lead. Then you want to push it farther. So that there’s one inch of the bare lead going on.
Twisting Wires & Finishing Steps.
Now comes the part where you need to do some twisting. Both kit and new wiring need to be mingled together with twisting. It should be done by one lead to one lead way. So that there’s a continuous wire length.
Onto the twisted lead, hold a soldering iron that is hot. Once the twist is also hot, you can apply the iron to wire. So that it can melt down a bit and flow with joints. With other twisted leads set, you need to repeat the process once again.
After allowing the metal to cool down a bit, bring heat shrink tubes. Simply slip them inside the tube. So that they can cover jointed leads. It would be great if overlapping is possible. And then you want to apply some heat from the hairdryer.
Make sure you are holding the dryer further away and not too close. So that there’s no uneven shrinkage ruining the step. You can stop when the joint has tubing shrunk securely. Go for the other lead as well. Then you need to reconnect the power of your system. Make sure to check the light fixtures if it’s working properly.
Wrap Up
Looks like we are done talking quite a bit about how to splice low voltage landscape lighting wire. The project itself sounds very simple and something that requires less research. But with any electrical projects, it’s best to stick with knowing as much as you can. Especially if these are the things you don’t bother with involving usually.
Those who are used to working on such projects won’t even need to look for this matter. But since you are searching for the matter, it already tells you’re a beginner who needs some guidelines. And I hope this guide was able to provide that. See You Soon with Some Other Topic!
I’m James. The author of Electricalaffairs.com. It’s been my passion to deal with power tools and gears. This website is mainly to talk about electrical wirings, lighting, various power source tools and accessories. I want to explore tackles and help people to grow their basic knowledge about electrical things. I would also like to help people to pick the right power tool for their daily needs.