Torchiere lamp, mostly common as a floor lamp, is an incredible idea to focus or highlight any specific area of your room. In the reading table, working table, or any other functional area, torchiere lamps do the job of concentration!
As much as this type of lamp is loved, people don’t know how to replace it. Well, working with the screws and small bulbs isn’t that easy, I agree! But today, I will show you the answer to “how do I change the bulb in my Torchiere lamp easily!”
Step by Step Replacing the Torchiere Lamp Bulb
How amazing the floor lamp with shelves on your room looks! But when it’s time to replace the bulb in your lamp, you have to do some extra effort. So, how do I change the bulb in my torchiere lamp and add a new one? Here’s how you can do it!
Step 1: Lamp Disconnection
The first job when it comes to Torchiere floor lamp bulb replacement is to disconnect the lamp. Check the wall outlet and you will see a cord connected. First, unplug the cord from the outlet.
A mistake that most of the users do is getting their hands on the lamp right after disconnecting it. Instead, I recommend you wait for a while after the disconnection. This will help the lamp to cool down completely.
If you try to get your hands on the bulb right after the disconnection, it will burn your hands. The oil on your hands will cause you to burn marks in cases. And not to mention there’s a chance of fire hazard too!
Step 2: Protect the Hands
In the next step, your work is to remove the bulb. But for this, it’s necessary to protect the hands first. So, you will need to wear gloves. You can rely on cloth gloves too. Or else, get some good-grade gloves for electric works.
No matter how cool the bulb is, it’s recommended not to touch the bulb with bare hands. This will keep the hands safe from any sort of burn marks from the remaining heat.
In some cases, you might not have gloves. Here, you can use cloth or a handkerchief. Paper towel works fine too.
Even before you start the replacement process, you have to find the right bulb for the lamp. Learn about what kind of bulb goes in a floor lamp and pick up the one that matches the old one.
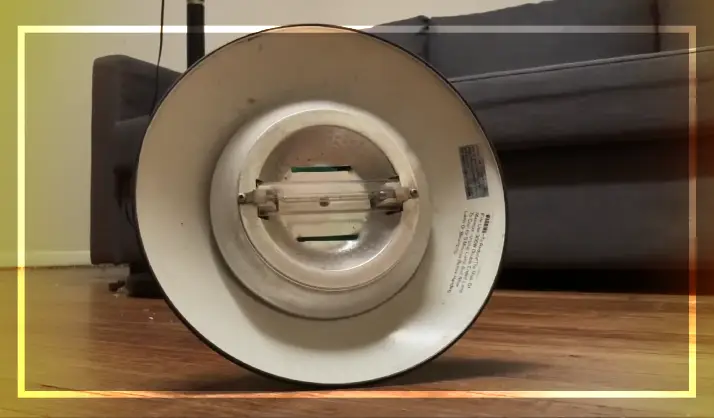
Step 3: Remove the Bulb
So, now, I will tell you how to remove the old bulb.
- First, get your hands on the glass which is over your halogen bulb. For this, you need to go through the screws.
- Get a screwdriver and slowly, remove all the small screws. Make sure you keep them in a safe place and do not lose them. A small bowl can be an easy way to keep them together. You will need them after you have installed a new bulb.
- After you are done with the screws, hold the glass and keep it beside you. There’s a chance that you break this glass. So, the safety of the glass should also be the priority.
- In some bulbs, you will see a twist-and-lock mechanism added. And some of them have a spring-loaded holder added. Removing these is easy too. All you need is the direction you go when you remove them. Take it off by pressing one of the ends against the holder. Remember this because when you will install the other one, it will be easy for you to install it.
- Now, it’s time to unscrew the bulb. Push down the bulb a little. Make sure your hands are gentle. To unscrew the bulb, go counterclockwise.
- Lift it out carefully. If you are dealing with a small bulb, you have to go through some added pins that secure the bulb.
- For these, you must push them in gently. At times, the pins might fall out of your lamp. This will make the work tougher. So, make sure that they don’t.
Step 4: The Right Bulb
Here, you have to go through the ANSI code. It will be printed on the bulb. When it is about replacing the bulb, you need the bulb of the same series of letters. Certify that the wattage is the same as this old bulb.
Take a note of the wattage and the ANSI code. Don’t forget the size of the bulb along with the type. It will help you pick up the right bulb when you need it in the future.
Check out Glove Electric Recessed Lights to find the right bulb of the right ANSI and wattage. I suggest you keep them pre-bought. It makes the work easier when you need to change them! Or you can keep a note of the number for working afterward.
Step 5: Add the New Bulb
Once you are done with removing the old torchiere lamp bulb and got the right bulb that fits, you have to install the new one. I tell you, don’t forget to wear gloves once again!
The new bulb will match the previous ANSI code along with the wattage, size, and type. When you have got your hands on the new bulb, place it in the place of the old bulb. And then, screw the bulb. Go in the clockwise direction this time.
After a while, it will be placed firmly. When you are done, get your hands on the glass cover once again and put it on top of the bulb. Again, you have to screw it to keep it in the right place. And you are done changing the bulb already!
Step 6: Test the New Bulb
It’s time for testing the new bulb! For this, hold the cord of the torchiere lamp and plug it in the wall. Switch it on and check if it works.
If it doesn’t, you have to go through the whole method once again ensuring the bulb is properly placed and the screws are in the right place. And after this, test it again. It will light up the whole room once you are done!
Wrap Up
No, my friends, the steps are not that difficult, isn’t it? It’s just like changing the bulb of any regular lamp but with a little precision. Follow my steps and you can change the bulbs whenever you want! Also, keep some bulbs stored in your house; they will come in handy when you need them!
I’m James. The author of Electricalaffairs.com. It’s been my passion to deal with power tools and gears. This website is mainly to talk about electrical wirings, lighting, various power source tools and accessories. I want to explore tackles and help people to grow their basic knowledge about electrical things. I would also like to help people to pick the right power tool for their daily needs.