 When you think about anther light fixture installation, things seem pretty simple and casual at first. However, when it comes to dealing with the wiring related to switching, things become complicated. Especially when you want to attach the fixture to an existing switch for power supply. The switch box having a neutral line will be able to complete your such wishes eventually.
However, you also need to be well prepared by learning how to wire light fixture and switch together to make that dimly lit area of your space more visible.
Complete Analysis of How to Wire a New Light Fixture and Switch.
You wish to get some Ceiling Lights for Bedroom or any other space in your house but the wiring process is confusing. Don’t panic and just follow the instruction explained below. If you are worried about more than one light fixture attached to a single switch, chill! I have a bonus section for that concern as well… Enjoy!
Tools You’ll Need for This Project.
Cordless drilling machine.
Drywall saw.
Hammer.
Screwdriver
Electrical tape
Needle nose pliers.
Voltage tester.
Wire stripper and cutter.
Utility knife
Wire nuts
Wall sconce
Fixture strap.
Double switch
Round remodeling box.
Electrical cable.
Preparation for Installation.
Before you jump into the installation with hope, it’s best to identify whether you can get a connection from the same box or not. And to do so, you should first check it by running the power off. Get the switch cover out and use voltage tester next. This will help you to ensure the power is actually off and you are safe to continue.
After the safeguarding, simply get screws out and pull switch from the box. You need to find the wire connector that has two or more white wires. This is the neutral one. If you figure out there’s only one white wire that has been already connected to switch, then you can’t power a sconce from this source, unfortunately.
Another important test you should do before actual wiring is while the power is turned on. Turn off the light and use voltage tester against each wire that is connected to switch. You need to identify the wire that makes light up. This is hot wire and goes to the new double’s switch’s hot side.
If you are going for a sperate single switch, this hot wire will be used for powering both switches. And then, you can go back to the power turned off situation for working with following procedure.
You might also need to do some calculations for deciding whether the existing box is capable of holding more wires. Once you are sure about this existing switch box, buy a sconce and pick a remodeling box. You also need some cable and electrical connectors.
Make sure to pick the light fixture first and then go for other elements. You need to calculate the amount of cable going between switch to box plus an extra three feet. Also, match the cable with existing wire gauge with either 14-2 or 12-2. The former type is thick as a dime and later one comes with a thickness similar to nickel.
Cutting A Hole.
You need to find out about stud’s location for fixing the box. Just hold the box on that location to fit it between studs. Next, use a pencil to mark down the canopy’s top and bottom parts. You need to place remodeling box on center and mark the box cutout carefully. Make sure you take notes on notches. These notches will be helpful for clam and other protrusions.
Knockout Removal.
You need to punch out knockouts from the box next. This should be located somewhere on top of the box. Also, use a screwdriver for punching easily. Simply push through this hole the cables gradually. It should come into sight at some point. If you can’t see it, reach through that hole for grabbing with hand.
Mounting the Remodeling Box.
You need to mount the remodeling box next. For this, you need to strip the cable’s sheathing of around 12 inches. Simply push it into box next using one of the box’s cable entry points on back.
Inside this box, you should see at least a quarter-inch of sheathing. When you connect switch, there should be some leeway going around on the wall. And to make that happen, you can simply leave some slack cable here. Fit the box into this hole and tightly clamp them into place.
Mounting the Light Fixture’s Strap.
Next, you will mount strap of light fixture into the box. For this, you simply need to strip those wire ends and connect them together. You need to simply trim those black and white wires at this point.
Go for around 8 inches while trimming. Make sure you leave the ground to wire enough long. Now connect both white wires together. Do the same for both black and copper wires as well. Around grounding screws, you need to loop the copper wire gradually. This should be done before connecting the fixture ground wire.
Now you need to connect the neutral white wire with a wire connector. The side of double switch that has jumper tab will get hot wire connection between terminals. Now simply mount the light fixture and screw switch to box. Finally, you need to install cover plate to end the chapter.
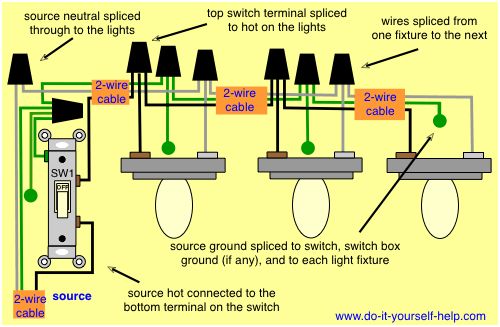
How to Wire 3 Lights to One Switch Diagram

you can follow the wiring method shown in this diagram to connect two or more lights to one switch. You can see in this diagram that the source is at SW1. From here two-wire cable starts running all way towards fixtures.
Using pigtail, each fixture’s hot and neutral terminals are spliced to circuit wires. And that continues towards the following light. This type of arrangement is easy to make and simple to wire for most cases.
Usually, when a switch box is easier to access, people thing about feeding wires from multiple light fixtures to that single one. Sometimes due to the temporary wiring need that should be easy to disconnect, people go-ahead for such wiring.
Also Read: Best LED Recessed Lights Review | Top 6 Picks
Conclusion
And that was all about how to wire light fixture and switch. It’s probably not a very wise idea to try wiring if you have no clue about how electrical components connect together through this. It’s best to stick to the conventional method of calling an electrician for this job. Because that way, you are kind of risking the entire electrical layout of your home. And That Must Be Scary!
I’m James. The author of Electricalaffairs.com. It’s been my passion to deal with power tools and gears. This website is mainly to talk about electrical wirings, lighting, various power source tools and accessories. I want to explore tackles and help people to grow their basic knowledge about electrical things. I would also like to help people to pick the right power tool for their daily needs.
