When you find it difficult to switch on and off the lights in your home, you should immediately check the switch. Is it working properly? Or did it get damaged? Of course, calling a professional to check the switch and related electrical wiring is convenient; you can complete it with a simple DIY wire tracing project.
And to aid you with the cause, we bring this discussion on how to trace light switch wiring at home. It isn’t as tough as most people think. You can quickly trace the wiring with a multi-tester or circuit breaker finder.
We will guide you through both methods with step-by-step instructions. So, let’s jump into the main discussion to trace the light switch wiring.
Two Methods to Trace the Light Switch Wiring
People think that professionals always need to deal with electrical and electronic appliances and systems in their homes. That’s not true since you can easily check and fix a few things. For instance, tracing the wiring of your light switch is an easy DIY task.
You may choose the following methods to check the wiring system and its functionality. The processes include:
- Using a multi-tester
- Using a circuit breaker finder
Method 1: Trace the Switch Wiring With Multi-tester
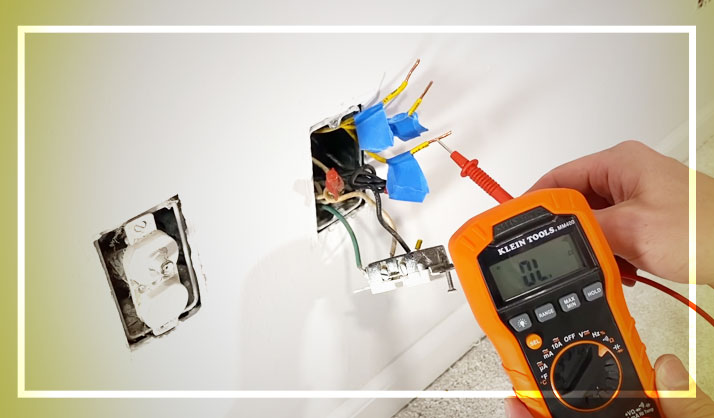
A multi-tester, aka multimeter, is a measuring tool. You can use it to measure different electrical properties of different electrical items. You can also use it to check the wiring of the light switch without even switching on the main circuit breaker. The multimeter’s easiness of use and accuracy make it a great deal for homeowners.
Step 1: Connect the probes of the tester with the electrical outlet
When you look at the multimeter, you will find two probes coming out from it. You need to connect the two probes with the electrical outlet for which you want to check the light switch. However, when you connect the probes with the electrical outlet, you must be careful.
It is important because connecting the probes with the electrical outlet is backward. It includes:
- The black wire will connect with the gold or brass
- The white one connects with the chrome or silver
Step 2: Shut off the power source
You should not turn off the power source of the specific electrical outlet with which you are working. It ensures that no one accidentally touches the outlet or wiring and gets a shock. You should find the power source on the electrical circuit of the light switch.
Then turn it off and start tracing the light switch wiring.
Step 3: Install the switch and trace its wiring
Remove the protective films from the switch and install them following the user guideline. You should wear gloves to protect yourself from electric shocks. Now, you can press the switch. Then, look at the reading in the multi-tester to find whether or not the switch is working properly. You may easily trace the light switch wiring with the multimeter.
Method 2: Use the Circuit Breaker Finder Tool
A circuit breaker finder is an electronic tool. It has receiver and transmitter sections and runs with a battery. You can use it to find the wiring of the light switch. Also, it would be best if you realized that the light switch is essentially a circuit breaker and connector simultaneously. When you turn on the switch, the two different circuits connect. On the contrary, it breaks the circuits when you turn off the light switch for the time being.
Step 1: Connect and set up the circuit breaker finder
Firstly, connect the circuit breaker finder tool with the electric outlet you want to trace the light switch wiring. After that, switch on the tool. When you turn on the circuit breaker finder tool, you will see the following readings on its monitor.
- Total electricity consumption of the circuit
- AMP and volts use of the circuit breaker
- How many circuits the electric outlet is using
Step 2: Prepare the circuit and switch for tracing the wiring
Now, you will need to prepare the electric outlet and switch to trace its wiring. For this, switch off all the light switches. Also, switch off the lighting fixtures over your head. Ensure that you have turned off all the fixtures and switches.
Otherwise, the electric circuit breaker tool may not work properly. When it happens, you will get full readings. You will, therefore, fail to trace the switch wiring.
Step 3: Start checking the circuit and switch wiring
Once you have prepared the electric circuit and outlet, it’s time to check the wiring of the light switch. For this, gradually switch on all the circuit breakers. As you switch on the circuit breakers, you will find which circuit controls which light switch.
You need to continue turning the circuit breaker until you find the right breaker. Then, please switch it on and off once again to recheck the wiring. Finally, turn on the switches of the overhead fixtures. You don’t need to worry too much since it is safe.
Nonetheless, there’re other methods you can apply to trace light switch wiring. It includes:
- Use an electric tester
- Use the electric printout
Some people may recommend you use a multimeter. However, the multi-tester and multimeter are essentially the same electrical tools. Thus, it’s the same process we have discussed in our first method. It is easy and so should be convenient for you.
Conclusion
The light switches of homes are designed to function for years without problems. However, it can be truly frustrating when the light switch starts showcasing the problem. So, you might consider calling an electrician to fix the light switch.
Thankfully, you can easily find out the problem following this guideline on tracing light switch wiring. The good thing is the methods to trace the wiring of the light switch, and overhead fixtures are straightforward. So, you can easily accomplish the DIY electric project.
I’m James. The author of Electricalaffairs.com. It’s been my passion to deal with power tools and gears. This website is mainly to talk about electrical wirings, lighting, various power source tools and accessories. I want to explore tackles and help people to grow their basic knowledge about electrical things. I would also like to help people to pick the right power tool for their daily needs.