 Ceiling fans are developing in technology and providing many exciting features with passing days. One of the common features included is a remote control. Of course, price of these ceiling fans is pretty high but so much worth the benefit.
The installation of a regular ceiling fan won’t be enough with one that includes a remote control. And so, you worrying about how to install ceiling fan with remote control is quite normal.
How to Install Ceiling Fan with Remote Control?
Here’s the entire process of installation that you can follow. These are pretty straightforward instructions. However, you should always be prepared well since dealing with electrical components isn’t the safest thing in the world…
Tools & Materials You’ll Need.
A wire stripper or cutter.
Electrical tape
Screwdrivers.
Ladder.
Turning the Power Off to Start.
Before any sort of installation relates to electrical components, we must turn the main supply off. So that while we are dealing with these parts, there’s no chance of getting shocked or causing such hazards later on. So, before you step into the actual process, don’t forget to visit the circuit panel of your home. Switch the appropriate breaker off and you are good to go.
Now the light and fan need to be set according to instruction. You should complete that pat before cutting the power.
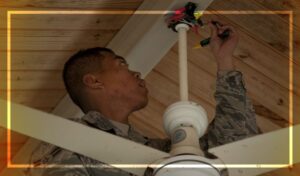
Getting to Wires.
Depending on what type of fan design you own, the access to wire should be different. Suppose you own a down rod ceiling fan, then the canopy close to ceiling needs to get exposed. Canopy is basically the cap or cover. This will make the electrical box visible. You also need to remove some screws here.
If you own a ceiling hunger or low-profile fan then there should be a housing flush against the ceiling. This housing looks like a bowl. You need to get it out by simply removing screws. This type of fan is also known as a flush-mount ceiling fan.
Depending on the fan’s designs, you may require to go through several extra steps for getting access to wiring. In some cases, the installation, person needs to simply rotate the canopy. After that, they get to see screws. Some other situations demand to remove the blade bracket. These are meant for holding the housing.
You will have a more specific answer to this step inside the owner’s manual. Make sure you refer to the instructions for getting proper idea about what to do.
Putting the Receiver on Place.
Now you need to place the receiver in its original spot. There should be wires on the ceiling. You need to make these wires lined up with the ones coming inside the sensor. In some cases, one needs to simply slide the receiver into the fan’s mounting bracket. However, there are also chances of needing to hang the receiver. In that case, you will use a zip tie to hand it from the bracket.
After placing the receiver, you need to check if it fitted properly. Then you can bring back the canopy or housing to install in its original spot. Make required adjustments to fit everything back to normal nicely.
Making Wire Connection.
Before you actually disconnect the ceiling and fan wires that are existing, take a picture and this will work as a reference later on. Twist off the wire nuts which is also popular as wire connectors. This will disconnect the fan and ceiling wires.
While making the disconnection, pay attention to what construction regarding this has been mentioned in the manual. Don’t make things extra confusing by ignoring the instructions.
You need to understand the electrical wire color codes as well here. Usually, US standards have these color codes to understand and identify the function of each wire. You need to connect the receiver to fan and ceiling wires maintaining the color-coding. Once you are over with this, use the wire nuts to fasten back to its place.
Sometimes you may find long wires that are difficult to connect. In that case, simply trim it to a comfortable length. You can use any random wire cutter for this step. Next, you need a wire stripper to get rid of a little bit of insulation from this wire.
Testing the Remote.
Now you can reassemble the fan but make sure not to complete it. You just need to reassemble on a point that lets an unimpeded turning. The issue is even severe with a flush-mount fan here. This is because the receiver, wires, and housing might knock against the fan’s motor. Especially when they are not tucked out from the way.
Follow the instructions to check whether the remote is working. You need to restore the power to test that. You also require a syncing process here. Usually, it’s about holding some specific buttons for a couple of seconds.
If you find out that the remote isn’t working, then shut off the power once again. And you need to go back for checking wire connections. Usually, it’s because of the improper color alignment of wires. So, you need to remove those and reconnect once again with wire nuts.
Fan Reassembling to Finish It Off.
Now you are at the end of making wire connections and getting remote work properly. If the canopy and housing are not yet at their original position then that’s all you need to get together. Make sure you screw the covers securely in their original place. And your ceiling fan is all ready with that remote control.
Don’t Forget These Safety Points.
You should check the circuit breaker with an off position as well during the starting phase. Simply use a non-contact voltage tester to complete this double-checking. Someone who has less experience with such electrical works must never skip this rechecking concern.
You should use wire cutters and strippers to handle the insulated grip. Also, be attentive towards where you are placing all those unfastened screws. There are many events where a person simply losses track of these tiny but seriously important components while handing ceiling fans.
At any point where you feel confused and concern about moving with the process, it’s best to stop and call a professional. Ceiling fan installation with remote isn’t the hardest stuff to do out there. But also, a sudden situation could appear in your case that might be good for an expert to handle. This can happen to even the most seasoned DIY experts.
Conclusion
And that was my simple guide on how to install ceiling fan with remote control. You just need to follow the safety priorities swell and also check the provided instructions in manual wisely. Usually, faultiness in such a process appears because of not understanding the manual’s instructions properly. And in some cases, it’s only because of not paying enough attention to those guidelines. So, make sure you are safe with those concerns.
I’m James. The author of Electricalaffairs.com. It’s been my passion to deal with power tools and gears. This website is mainly to talk about electrical wirings, lighting, various power source tools and accessories. I want to explore tackles and help people to grow their basic knowledge about electrical things. I would also like to help people to pick the right power tool for their daily needs.