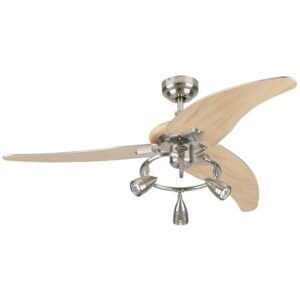
 A master bedroom ceiling fan has to be one of a kind to keep your night sleeps as peaceful and comfortable as possible. And that demands a proper selection in ceiling fan.
Once you have gone through the purchase phase by delicately taking your needs into consideration, the next step demands to get a proper installation. Now it could be done either by yourself or contacting a professional.
Personally, I feel the installation is quite simple. So, learning the installation process a bit deeply is no harm to you. Maybe you can save some extra bucks by doing so. Let’s talk about how to install ceiling fan mounting bracket, which is known to be quite a complex step. And we’ll also discuss the following further steps.
How to Install Ceiling Fan Mounting Bracket, Ceiling Fan & More.
The process isn’t too complex and you can do it after a little bit of curious learning. I’ll include some safety steps for you to maintain the tutorial without any accident. Make sure you don’t rush over these things.
Safety Guidelines to Follow.
- Go to the circuit breaker box and turn it off.
- Clear out the installation site beforehand.
- Get the box marked with UL approbation.
- Local codes, ordinances or National Electric Codes complied connections should be ensured.
- Be prepared with a warning, safety, and additional caution by reading the manual thoroughly.
Get These Tools.
For the process, you are going to need a crescent or adjustable wrench, voltage tester, stripper or wire cutter, pliers, screwdrivers, tape used by electricians, a ladder, proper dust mask, and safety goggles. These are basically what you would require to fix mounting bracket, install and troubleshoot ceiling fan.
Decide the Spot Where You’ll Install the Fan.
Selecting a good spot for your ceiling fan installation is what you need to do first. And the big question also needs you to consider nearby power outlets for electric supply. Now if you already had one old fan to replace, this should not be difficult.
You can also install the fan on an existing light fixture by replacement. Simply dissemble the fixture. You should get rid of the light bulbs and decorative glass to do so. Eliminate the fixture holding screw next. After that remove the plastic wiring connector to break connection. And then the fixture is completely out.
Sometimes electric box is right above ceiling joist making the whole thing super easy. In such a case, you simply need to bracket your fan to the joist. And the support will be ongoing from then. However, if the electric box is in the center with two joists on both sides, then go for a support bar installation.
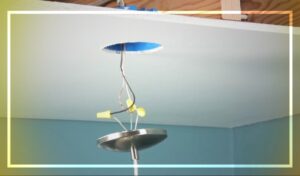
Installing the Electric Box.
 You should get an electric box that completely supports the fan or is capable to do so. There are ratings stamped on it to check. If the light fixture where you would fix fan is pretty small, go for an electric box that can handle fan vibrations as well.
There should be attic access to install a support bar. In some cases, the bars have a direct connection to joist with screws. Expandable cross pieces with spike ends are nice to have with a fan box in other cases. This allows you to simply twist the crosspiece. And then the expansion happens so that you can dig those spike-ends into joists easily. It allows a proper holding of the fan.
After getting the old box out, place retrofit box wholly. You should put it above the hole and rotate using your hand. Do so until the box seems to protrude from hole. The crosspiece and joist should be perpendicular as well.
Before setting everything in position, you also need to work on wires in the wiring box. Using a wrench simply twist the crosspiece. This will make the end spike dig right into joists. Reattach the ground wire after placing electric box in place securely.
Attaching Mounting Bracket.
As soon as the electric box is right in position securely move for assembly task now. Maximum ceiling fans will have a mounting bracket system. These come with a direct screwing strategy to go with a new wiring box. Plastic foam pads are noticeable in newer models these days. These are meant to reduce any noise or vibration problem.
Simply place the bracket over. Now using the screws, attach it to the wiring box. There is sometimes a plastic half-bolt joint noticeable. These are accommodated by the bracket with a unique shape. The segment holds rod of fan mounting down securely. This rod is meant to support the motor of fan.
The decorative ceiling plate comes next. Place it over the mounting bracket and install it. This could vary from one model to another. However, usually, there are screws, adhesives, brackets, and other combinations to attach this plate.
Rest of The Fan Installation.
 You need to complete the installation following manufacturer’s guidelines. Through cowling and rod, insert wires to make it travel into the motor’s top part. Connect wire next after attaching the fan with a mounting bracket. You can use the cowling cover’s holes to screw and keep motor in place while making connections. A partner or a kit can help you to hold the fan in its spot.
Securely make connections with wire and attach the fan to bracket. The half-ball joint comes into mounting bracket next. The metal tab in bracket should line up with joint’s groove. The motor should be free to move and rock. Secure the cowling cover in place.
Using a magnetic tipped screwdriver, you can easily install the blades and light kit. Do not overtighten the screws while driving them in. Gradually attach every blade with the screws.
Now for ceiling fans with bright lights, you can connect it to a light fixture. There are connectors to plug with the right mate and make a connection. Use the mounting screws to secure fixture in place after wiring it properly.
Aslo Read: Best Ceiling Lights for Bedroom | Top 6 Picks
Conclusion
Learning how to install ceiling fan mounting bracket with the actual installation is not a tough thing to do. You just need to follow some simple guideline and installing a ceiling fan yourself will never be hard again.
Make sure you get a proper note on every step to make the process successful. Also, it’s a good idea to study more by reading and watching resources before actually trying the installation.
I’m James. The author of Electricalaffairs.com. It’s been my passion to deal with power tools and gears. This website is mainly to talk about electrical wirings, lighting, various power source tools and accessories. I want to explore tackles and help people to grow their basic knowledge about electrical things. I would also like to help people to pick the right power tool for their daily needs.