 Brightening up entire home with lights to keep the decoration shining is our very own concern. Since we all know how important the light factor is to maintain preferable home decor.
Sometimes, lighting of a certain place can entirely change the game of beautification. Interior designers and homeowners all are in great love with various types and styles of lighting fixtures that can add the extra glam effect to their work or home.
Once you get the perfect ceiling light fixtures, next thing that piles up is looking for someone who can help with installing these. But wait, there might be another option you should at least know about before calling a helping hand. We’ll be talking about that today!
How to Install a Ceiling Light Fixture: Do-It-Yourself Guide for Anybody.
Yes, buddy! We are going to discuss how to install ceiling light. All by yourself! Without needing any professional knowledge of electrical handling.
This is actually a very mere installing process that anyone can do. And that’s why when I saw my sister in law hiring a person for such bare minimum thing, my decision for writing about this was made.
If you are interested in buying one, go read our review ceiling lights for bedroom guide first. It’s quite helpful!
Following the steps, I’m about to discuss, you can easily install the ceiling light fixtures. Let’s Go!
1.
Get the Old Fixture Out.
Start with turning off the electricity from main circuit panel. This is very important for someone who has never tried electrical handlings before. Make sure to double-check if the power has actually cut properly.
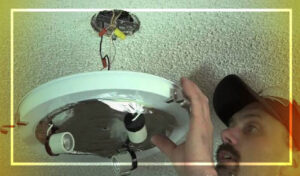
Now there should be a canopy part in your old light fixture. Find that part and gently unscrew it with care.
The junction box needs to be visible at this point. Make sure you get rid of the wire nuts. Now simply separate the supply wiring from the previous light fixture.
Look for any damage. There might be some wear and tears in the wiring. Usually, it is either fraying or broken issues. If that’s the case you may need to change them or clean. Let the wire stay open for next steps
2.
Junction Box Examination.
You need to check a few points with the junction box now. Is the box securely attached with ceiling joist, make sure of it.
Also, see if junction box is capable to handle the weight of fixture you’ll be replacing. It needs to be sturdy enough to carry the new light’s overall weight.
Sometimes you may figure out that the new light fixture is more in weight than the existing junction box. In that case, you’ll need to add some extra accessories to balance it up. In most cases. People use an accessory mounting startup. Support rods are also quite famous for such needs.
You can easily install these additional parts next to the junction box. Once the installation of new fixture light is done, it tends to hide extra hardware.
3.
For Hanging Light Fixture.
For hanging purpose there are several supporting elements that you need to use. Some try using supporting chains to make it look beautiful. While others prefer cable support for hanging these ceiling light fixtures. It actually depends on what preference you have.
First, you’ll thread or hung wires next to or through the supporting element. You need something to prop up fixtures. You can use the paint tray of a stepladder for that purpose. This makes feeding wires into junction box quite simple and easy.
You need to guide wires through the canopy. Make sure you are as gentle and careful as possible. Next, go through the ceiling plate in a similar gentle motion. Finally, traverse through the handing bracket of your new fixture.
Now you need to strip off some part of your fixture wire. In most cases, stripping off around half an inch of wire is sound enough. Do the same with supply wire as well.
4.
Wire Connections
The available light fixtures in the market come with color codes. These are usually to notify about the black and white wire.
You need to find the fixture’s black wire that was stripped in previous step. Then hold the supply black wire’s stripped and bare end. Now simply twist together these two ends carefully. You need to make a secure connection here.
Use a wire nut to securely connect them. Do the same for both fixtures and supply’s white wires. Bring them closer and twist them securely adding a wire nut at last.
Some fixtures come with green-sheathed ground wire. Also, there could be bare copper wires. You need to connect these with copper or green grounding screw of the mounting bracket.
Next, tuck these wires into junction box gradually. You need to put a bulb of your choice into the fixture. Go back to the main circuit and turn it on.
If you see that the bulb is on then your wire connection was done rightly. You are still not finished so go back and turn off the circuit breaker once again.
5.
Fitting Light Fixture in Place.
Now time to screw the ceiling plate to supporting attachment. You need to mount them into the mounting strap or support rod whatever chosen.
Simply put the stem for mounting into ceiling plate. The installation must be very secure and tight. Also, you need to ensure that the height of hanging is right.
Sometimes due to using a chain, the height might be too long. You can easily get rid of some links to deal with those problems. Also, you can try looping extra chain around the stem.
Next, slide the canopy into place. This should make the mounting hardware not visible. Now to keep the canopy in its place, simply tighten locknut.
You need to place the right bulb at this point. Turn the electricity finally. And the radiance through your ceiling light fixture should please you to fullest.
IMPORTANT TIPS.
For the fixture fixing into ceiling, you’ll use some sort of ladder for sure. Make sure you use a good stability providing ladder for this. It’s going to be quite hectic up there while making connections. Don’t trust just any random old ladder that seems to have problems. It can risk your safety.
Make sure you wear protective gloves. Even when you are working with the mainline off, there are still chances of defective circuit causing a mishap. You don’t want to take a chance and so wear the right gloves.
While making connections never connect the white wire with black ones. You must follow the color code rule.Sometimes you need to go for multiple times of changing and installing new light because the previous one didn’t match your home decor.
Make sure you don’t randomly fix lightings continuously to check if it suits your decoration. You can always research or ask a decoration expert for that.It could be quite of a hassle, working without the necessary tools.
Climbing up and down constantly to get the tools is bothersome. So just simply get everything necessary in your ladder’s paint tray at once. This will save time, effort and mood
Also Read: Best Bathroom Exhaust Fans with Light and Heater Reviews
Conclusion
One truth about home decoration that everybody agrees to is that without proper lighting it’s never going to look good. Maybe livable but not beautiful. And I hardly meet people who don’t wish to live in a mood cheering environment after a hectic day at work.
Poor positioning or plain old boring lightings are not worth it to ruin your home mood, so do something about that! You can follow the steps on how to install a ceiling light fixture that I just explained and make your living place feel like home. Good Luck!
I’m James. The author of Electricalaffairs.com. It’s been my passion to deal with power tools and gears. This website is mainly to talk about electrical wirings, lighting, various power source tools and accessories. I want to explore tackles and help people to grow their basic knowledge about electrical things. I would also like to help people to pick the right power tool for their daily needs.