 Calling your plumbers for everything you need isn’t only a lengthy process but also heavy on your wallet. And so, you can keep the easy works for you! When you plan to install a water heater, you will surely need to wire it! How about learning how to wire a 220v hot water heater alone?
Yes, we will focus on the basic details of wiring a 220v water heater with the ultimate precautions and safety! Let us jump right into the method!
Step by Step Guide to Wiring Hot Water Heater
No matter you are using the small water heaters or the 50-gallon electric water heaters, the process of wiring them is the same! Let’s know how to do it!
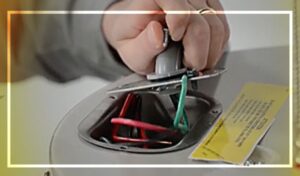
Step 1: Taking off the Cover
To learn how to wire a 220v hot water heater, the first thing you need to do is go through the junction box cover. Mostly, the top of the water heater is the junction box cover. However, at times, you will see that the junction box cover is located on the side of the heater.
All you have to do is locate the cover first. After this, your work is to remove the cover so that you can get access to the inner portion of the water heater. For removing this cover, you might require a screw or so. There will be two lead wires added to the water heater.
All you need to do is to uncover the lead wires. After removing the screw, you have to go through a ground screw too. Remove it and make the space free for your next steps.
Step 2: Checking the Voltage
As you are working with the electrical components, your first job is the check the voltage. Yes, you might think it is not necessary for you but trust us, it is. On the contrary, if you are a seasoned electrician, even then you need to go through the voltage and test it. If there is power running to the device or the appliance, you might end up causes unwanted accidents and severe damage to both you and you’re properly.
So, we recommend you check and ensure that there is no power running to the appliance when you get your hands on the components. If you see that there is a power, you cannot start working; this situation is known as the LIVE circuit. You can think that you are allowed to work in this situation but you can’t. If you start working in this situation, you will void the warranty.
Apart from this, personal injury is very common in such cases. So, we highly recommend you not to manipulating wiring if you see that the power is still running. However, there are also situations when you will be unsure about the power.
As a result, you won’t know if there is power not running or it is a LIVE circuit. In such cases, go through the voltage meter because that’s the only way you can learn more about it. With it, you can easily check if power is running to the lead wires or not. And when you see that the power is still running, you have to prevent it or interrupt it.
For this, you must check the GFCI breaker in your plug, and then if you find it, you must press the TEST button. You will find the button on the outlet in the center. Rarely, you might find any such option there. All you need to do is search for the appropriate breaker. You will get this one at the power supply breaker box. All you got to do is go through the switch and set it to OFF!
Step 3: Taking off the Knockout
Now that you are done testing the voltage and making sure that the power is not running, you are almost ready to go for the wiring. Here, you have to get your hands on the knockout. You might not find it immediately. For this, you have to search for it. You will get this one within the junction box! In this position, you have to take it off.
Taking it off won’t be too easy, we won’t lie. And for this, you will surely need to be precise in your work too. Here, get yourself some needle-nose pliers. These will help you remove the knockout from the junction box with accuracy.
Step 4: Stripping the Wire Insulation
After you have completed the previous procedure, you have to move towards stripping the wire insulation. To work properly, you need to expose the wiring before you; otherwise, you won’t be able to get your hands on the wires.
Firstly, you might require running the cable by yourself too. Even then, you have to get your hand on the plastic sheath. After removing it, the wiring will be visible before you make the work easier than before. The space you need for your work entirely depends on you. But mostly, people require 6 inches to go when it comes to the junction box.
All you need to do is strip more or less 0.75 inches of insulation. You have to maintain this distance from every individual wire.
Step 5: Fishing the Wiring
Once you are done with getting the space for working with the hot water heater’s junction box, you have to step to the next portion of your job. Here, you have to fish the wiring. Check for the ROMEX connector first. Then, get your hands on the wires and all you need to do is run these wires through the connector we have mentioned above.
Now, take a look at the NM cable. You have to hold the sheathed portion and then clamp it over. Once you have done it, you have to check for the wires. In most cases, there are wires that you don’t want to leave exposed. So, ensure that there are no exposed wires and you have been through each one of them to certify the protection.
Go back to the ROMEX connector once again. Place it properly and search for a lock nut. Once you get it, permanently add it there. However, keep in mind that you have to position the ROMEX connector in a way that it doesn’t touch the water pipes. Otherwise, the hoot water’s temperature will hurt the wires.
Step 6: Adding the Heater and the Circuit
Here, in this position, you are also done with the wiring procedure. All you have to do is connect the heater now. Add the water heater to the circuit inside the junction box. Now, you have to get your hands on the ground wire.
Take it and wrap it surrounding the ground screw. After surrounding it properly, you have to secure it there. Check the circuit and search for the black wire. Now, pick up another wire from the water heater, it can be anyone! All you have to do is connect these wires by twisting them together. For securing it, you will need a wire nut. Get it and secure it.
After this, you have to search for the white wire and with the help of electrical tape, you have to wrap it. You need to wrap it over its insulation so that you are capable of identifying it. Go through the breaker panel and repeat the same there. Check the other wire in the water heater and connect it with the white wire just the way you did before!
Step 7: Replacing the Cover
Now, it is time for you to replace the junction box cover. Take water and fill it up. After pouring water, you have to turn on the circuit breaker. Your new water heater is wired and ready!
Wrap Up
So, you have to check out the easy method of how to wire 220v hot water heater in seven easy steps! Now, that you have learned it properly, all you need to do is get your gears and do it yourself!
Have you ever tried wiring a water heater in this method? What mistakes do you do? Share your opinions with us because we are here to listen!
I’m James. The author of Electricalaffairs.com. It’s been my passion to deal with power tools and gears. This website is mainly to talk about electrical wirings, lighting, various power source tools and accessories. I want to explore tackles and help people to grow their basic knowledge about electrical things. I would also like to help people to pick the right power tool for their daily needs.