 The new washing machine you got is good and bad news for your house right now.
Good news because you’re getting a new machine which of course is better at washing than the older or maybe broken one.
Bad news because now you’ll have to spend some extra bucks to get someone to do the installing for you.
But wait, how if you install the washing machine yourself? Is it even possible without never doing before? We are about to find out.
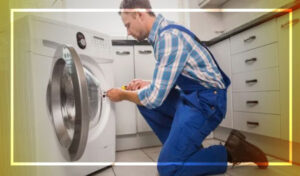
COMPLETE INSTALLATION: How to Install A Washing Machine Drain Pipe.
Well, the answer to my questioning intro is yes, you can do this installation yourself. Of course, you’ll have to go through a bunch of know-how before that.
And to make that happen I’m going to discuss my go-to tutorial on how to install a washing machine. You can learn about connecting the drainpipe and setting up washing machine following this step-by-step guide.
So, let’s go for tools you’ll need all the way through installation process.
Go Get These Things
- Mole wrench or grips.
- A bucket or tray.
- Spirit level.
- Screwdriver.
01 Switching Off.
- So, to start installation, your first job is to switch off the old washing machine and unplug it completely.
- You need to empty the drum and take out any clothes inside. Then go to the main plug where your old washing machine is connected. Unplug it and the machine should be completely off from electricity.
- Now you’ll have to switch off the cold-water valve as well. To do so, you’ll pull away the machine from wall.
- There should be an isolating valve which you need to shut off as well. This is usually a small tap colored blue. With switching it off the cold-water supply will stop.
02 Cold Water-In Pipe Detachment.
- The supply for cold water usually attaches to mainline via a hose. You can see or find the hose behind the washing machine.
- Find that hose connecting the cold-water supply to mainline and switch it off. You need to unscrew the pipe before.
- Use a tray or better put a bucket below the area. So that any water getting dripped could be caught using the storage.
- Once the cold-water supply is off there should be only a few drips coming out and nothing else.
03 Waste Water Hose Pulling Out.
- Now there should be another hose going from the washing machine. This hose usually goes to the kitchen floor. It’s known as the wastewater hose.
- You will have to disconcert this as well. Simply pull it out but with gradual hands.
04 Carriage Bolts of New Washing Machine.
- Your new washing machine will have some carriage bolts that you need to deal with. These are probably attached at every back of your washing machine. You need to remove them before going for the installation.
- These bolts are here to make sure the drum is securely fit in place. It keeps the drum in place without any movement. This also helps to avoid any kind of potential mishap while the machine is in transit.
- There should be four total screws that are attached to plugs. You need to remove them by unscrewing using a screwdriver. Once they are loose enough, use your hand and pull them out.
- Keep them in a safe place and make sure they don’t get misplaced.
05 Cold-Water-in Hose Attachment.
- After settling with the screws, it’s time for the hose of new washing machine. You will usually discover the hoses inside new washing machine’s drum. So, to get that, simply open the door of drum.
- There should be an attachment at the top behind machine. Simply attach it with the cold-water pipe-in. You can use mole grips to do the attachment. Those who don’t know what is mole drip, this is basically a spanner with extra weight. Some call it vice grips, pliers or even mole wrench.
- While doing this, there should be a filter inside attachment that will come into your attention probably. This is a part that might help you later in the future when machine stops working. You can simply unscrew this part and get into the filter for washing it under tap.
- Another end of the water-in hose goes straight to cold water supply. You need to screw this part after attaching it in place.
06 Turn on Valve.
- As soon as you connect the cold-water supply hose, it’s time to check everything for a while. Simply release the isolating valve. So that water can flow through the pipe.
- Now you need to check for leakage and if there are any dripping points once the water starts to flow.
07 Connecting Waste Water Hose.
- It’s time to connect the waste water hose to washing machine This needs manual feeding to wastewater down pipe.
- In most of the washing machine models launched recently, there is a U-bend to attach hose. It is usually made of plastic and the rigidity is quite good. The bend is very helpful to keep hose shape in perfect form with regular usage.
- There should be no blockage problem with the hose. So, you need to attach this U-bend to the wall. Simply put the washing machine back in place once connection is done.
Stable Your Machine.
You are almost done with the installation. However, it is important to make sure that the machine is on level before using it for first time.
Most of the washing machines today usually use up to 1600rpm. So, if you are not conscious about the washing machine’s balancing then there could be a problem. With that amount of power, it’s surely going to create unwanted vibration as well as noise.
This is not good news for your machine’s lifespan and also there can be frequent damages. So, make sure after placing the washing machine in place, you use a spirit level. This tool will help you to find out whether the appliance is in level.
You can also try to rock it back and forth gently. If there is no movement then your washing machine is maintaining a good level. Otherwise, you have to adjust legs at the front and make it stable. You can use a spanner to do the job.
Simply loosen the locking nut to do so. This nut usually locks the leg in position and once you loosen it use a spanner. This tool will let you raise or lower the machine. You should check if the level is right this time. If so, then simply tighten the nuts. Continue to raise or low down the legs until machine is on right balance.
DEALING WITH PROBLEMS.
There are many queries about how to install a washing machine drain hose which I already sorted. But when it comes to the drain line, some problems might come up as well.
For example, there might be no water flowing from drain or the standpipe is spilling out. This may be because of a full or partial blockage. In such a situation you must contact a professional.
Those who are asking about how to install a washing machine drain line avoiding such problems can try the safest way. And it’s by contacting a plumber. Especially when you are not sure about your capabilities for such an installation.
Tips
- Make sure you start the installation process after reading every instruction well. You should go through the guidelines that come with your new washing machine.
- A washing machine is a very sensitive appliance you make sure you don’t haste any process.
- If you are dealing with any small leaks on the piping thread, Teflon tape can help greatly. However, with worsen leaks, you should think about replacing pipe.
- Make sure you install a cup on the hot water inlet. This is necessary for the washing machines that come with both cold and hot water inlet. Otherwise, there could be damage or leaking problems later.
Conclusion
I hope this guide helps you with how to install a washing machine. I don’t want you to feel discouraged. But still, let me spell it out. If you are not sure about doing the job yourself, it’s okay to contact a plumber. That’s much better than later discovering one or two parts damaged because you were confused.
However, most of the homeowners do try installing their new washing machine themselves. So, if you have some idea about minimal appliance installation, this will not be too hard to try.
Good Luck!
I’m James. The author of Electricalaffairs.com. It’s been my passion to deal with power tools and gears. This website is mainly to talk about electrical wirings, lighting, various power source tools and accessories. I want to explore tackles and help people to grow their basic knowledge about electrical things. I would also like to help people to pick the right power tool for their daily needs.